CenterPoint Payroll
- Setting Up Leave (Step 1)
Understanding Leave Video - Duration: 2 min 51 sec_24.jpg)
Setup Leave Categories Video - Duration: 7 min 42 sec
Entering Beginning Leave Balances Video - Duration: 4 min 59 sec
Calculate Paid Leave Video - Duration: 6 min 42 sec
Leave Adjustments Video - Duration: 3 min 43 sec
| Document #: | 3008 | Product: | CenterPoint Payroll |
|---|
This document explains how to setup leave (vacation, holiday, paid time off, etc) for your employees. Leave can be setup to accrue a number of ways (Yearly, Monthly, Percent of Earned Hours or Fixed) , all options are explained below. Leave setup is comprised of four steps:
Step A: Add Paid Leave Earnings
Paid leave earnings are used to track the number of hours used for each type of leave. To accurately calculate available leave, it is recommended that you setup a separate earning for each Leave type (vacation, sick time, paid time off PTO, etc.) offered.
- Select Setup > Payroll Details > Earnings. If a paid leave earning such as "vacation" does not exist, click New.
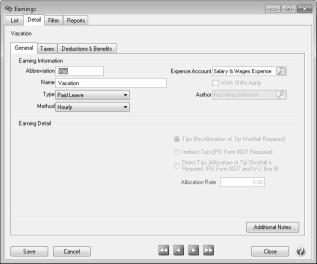
- In the Type box, select Paid Leave.
- Enter an Abbreviation and Name, such as V and Vacation or S and Sick Time.
- In the Expense Account box, select the expense account for the earning.
- Click Save. Follow steps 1-4 for each additional earning needed to track used leave.
Step B: Add Leave Categories
Leave categories define how often leave is awarded to the employee, when it is awarded, if there is a wait period and can leave be carried over from one year to another. Multiple leave tables can be based on one leave category. A leave category is assigned to each leave table (Setup > Payroll Details > Leave). Multiple leave tables can use the same leave category, but the leave category prints on the check stub notifying employees how much of each leave time (vacation, sick leave, etc.) they have available so a separate category for each type is recommended. If you have multiple leave tables for a type of leave (for example, you calculate leave differently for hourly employees vs salary; then you'd normally setup one leave category and two leave tables).
- Select Setup > Payroll Details > Leave Categories. Click New.
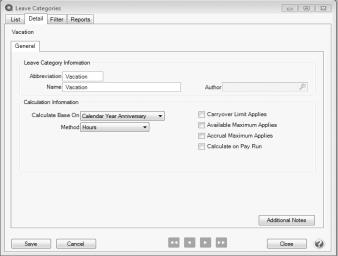
- Enter an Abbreviation and Name such as Vacation or PTO.
- In the Calculate Base On box, is used to calculate how long an employee has been employed (Years of Service). Is their "anniversary" based on their hire date (Eligibility Date Anniversary), the Calendar Year or the end of the companies Fiscal Year.
- Calendar Year Anniversary: The number of times you reach the calendar end-of-year date. For example , if an employee is hired on March 20, 2009, they will have one year of service on December 31, 2009; two years on December 31, 2010, etc.
- Fiscal Year Anniversary: The number of times you reach the company's fiscal end-of-year date. For example , if a company has a fiscal year-end date of May 31 and an employee is hired on March 20, 2009, they will have one year of service on May 31, 2009; two years on May 31, 2010, etc.
- Eligibility Date Anniversary: The number of times an employee reaches the date. This date may be representative of any date, for example it may be the employee hire date. For example, if an employee is hired on March 20, 2009, they will have one year of service on March 20, 2010, two years of service on March 20, 2011, etc.
- In the Method box is used to specify how often an employee is awarded new leave. Select one of the options below:
- Once Yearly: An entire year's leave accrual is calculated and awarded at one time. For example, if employees receive their entire years leave on January 1 or on their anniversary date.
- Once Monthly: Leave is awarded to the employee monthly. CenterPoint Payroll calculates the year-to-date monthly accrual each time the Calculate Leave transaction is completed. For example, if an employer is on a calendar year and a leave calculation is made any time during the month of January, the application will accrue one month of vacation. In July, the application will recalculate the accrual for seven months.
- Hours: The accrual of leave is a percentage of earning hours. For example, if the total hours worked in a year is 2080 and the amount of vacation awarded is 40 hours, the calculation is 40/2080 = .0192. You can specify which earning hours should qualify for accruing leave hours. Hours are recalculated from the beginning of the year each time a calculation is completed.
- Fixed Rate: Fixed rate leave adds the same number of hours (fixed rate) each time leave is calculated. This differs from the other methods which recalculate from the beginning of the year with each calculation. Fixed rate leave is usually used for leave that accrues a certain number of hours every pay run.
- Select the Carryover Limit Applies check box to set a limit to the number of hours that can be carried over to the next year's leave. If an employee can carryover an unlimited number of available hours from one year to the next, then do not select this box. If this box is selected, you must specify on the Leave table how many hours can be carried over (step C8 below). If this box is selected, but no limit is assigned on the leave table, all available hours will be zero'd hour at year end.
- Select the Available Maximum Applies check box to set a maximum number of available hours an employee can have at any given time during a year. If an employee is allowed to have an unlimited number of leave hours, then do NOT select this box. If this box is selected, you must specify on the leave table what the available maximum number of hours is (Step C8 below).
- Select the Accrual Maximum Applies check box to indicate that the leave will have a maximum amount applied to hours accrued during the year. This option is not available when Fixed Rate is selected as the Method.
- The Calculate on Pay Run check box is used only if Fixed Rate or Hours was selected for the method. It allows the leave to accrue on each pay run rather than running the Calculate Paid Leave transaction.
- Click Save. Create additional categories as needed.
Step C: Add Leave Tables
Leave is used to setup specific vacation/leave tables that can be assigned to an employee and used in leave time calculations.The Leave Table defines how much leave should be calculated for each employee based on the leave category and the employee's number of years of service. You may need multiple leave tables for different types of employees.
- Select Setup > Payroll Details > Leave. Click New.
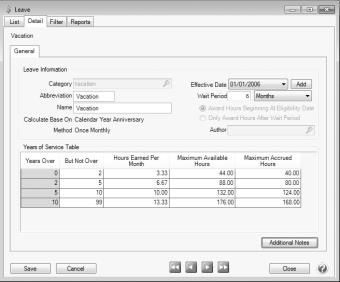
- Select the Leave Category. The leave category determines whether or not Carryover Hours and Maximum Hours apply. The category fills in the Calculates Based On and Method options.
- Enter the Abbreviation and Name for this leave.
- The Effective Date box should be left at the default date during the initial setup. The Effective Date allows you to make changes in the future to the leave table and maintain the history of the leave definition.
- In the Wait Period box, enter the period of time a new employee must work to qualify for this leave (if applicable). The wait period can be managed by hours, days, or months.
- Select how/when hours are awarded. Important: this cannot be changed after the leave category is saved.
- Award Hours Beginning at Eligibility Date: Hours start accruing on the eligibility date. If a wait period is entered, leave will be calculated from the original eligibility date after the wait period is over.
- Only Award Hours after Wait Period: Hours start accruing and are awarded after the wait period.
- The columns displayed in the table will depend on the selections made in the Leave Category assigned to this Leave. Not all columns will be included for each table.
- Years Over – When an employee’s years of service is equal to or greater than this number the application will use the leave accrual variables (hours earned, maximum hours, etc.) entered on the same row to calculate leave.
- But Not Over – This is the ending range for calculating the leave accrual based on years of service.
- Hours Earned – This heading label varies according to the Leave Method selected on the Leave Categories screen. If the Leave Category is set for:
- Accruing Once Yearly - The heading label will be Hours Earned. Enter the number of hours the employees earn per year.
- Accruing Monthly - The heading label will be Hours Earned Per Month. Enter the number of hours employees earn per month.
- Accruing Percentage of Hours Earned - The heading label will be Rate Per Hour Earned. Enter the percentage of their annual hours earned (if the employee works 2040 hours per year and gets 40 hours vacation, the value would be 40/2040 = .0196078 or if an employee works 2080 hours per year and gets 40 hours of vacation, the value would be 40/2080 = .0192307).
- Accruing Fixed Rate - The heading label will be Hours Earned Per Accrual Period. Enter the hours earned per accrual period.
- Maximum Available Hours – When the Maximum Available Hours check box is selected on the leave category, this column appears on the grid.
- Maximum Accrued Hours - When the Accrual Maximum Applies check box is selected on the leave category, this column appears on the grid. This column represents the total hours an employee can accrue for the leave item annually.
- Carryover Limit Applies – When the Carryover Limit check box on the leave category is select the column appears on the grid.
- Click Save. Follow these steps again for each leave table that is needed for your employees.
Step D: Assign Leave Tables and Categories to Employees
- Select Setup > Employees or Setup > Payroll Details > Employees and select an employee that will use leave.
- Select the Earnings tab.
- Select the Employer on the top left side of the screen.
- In the lower-left portion of the screen all available earnings will be listed. Select each leave earning that is appropriate for this employee.
- Modify the Earning Detail for each Leave Earning:
- Single-click on a Leave Earning in the top left side of the screen to display the Earning Details on the right.
- If you do not want this leave automatically displayed in every pay run, remove the check from the Display in Pay Employees Grid box. You will be able to select the earning when needed in a pay run.
- In the Rate box (this heading label varies according to the earning type, for salary earnings the heading is Pay Rate and for hourly earnings the label is Hourly Rate), enter the employee's hourly rate. For salary employees, enter an hourly rate of 0.00 so you can track hours used.
- Complete steps a - c for each leave earning.
- Select the Leave tab.
- Select the Employer on the top left side of the screen.
- In the lower left portion of the screen, all available Leave options will be listed. Select each Leave that is appropriate for this employee. Note: Selecting a leave will add it to the employees list of earnings in the top left side of the screen.
- Modify the Leave Details for each Leave option:
- Single-click on a Leave in the top left side of the screen to display the Leave Details.
- Verify the Eligibility Date and change if needed. Note: All balance fields will be zero until beginning balances are calculated.
- In the Earning box, select the appropriate Leave earning. This is used to track how many hours of payroll have been used for this leave type.
- Complete steps a - c for each Leave assigned to this employee.
- Complete Steps 1-9 for each employee that is eligible for leave.